

Using your existing cameras with a cloud VMS
 By Muhammad Talha · Product Manager and CTONine years building computer vision and automated surveillance systems · Updated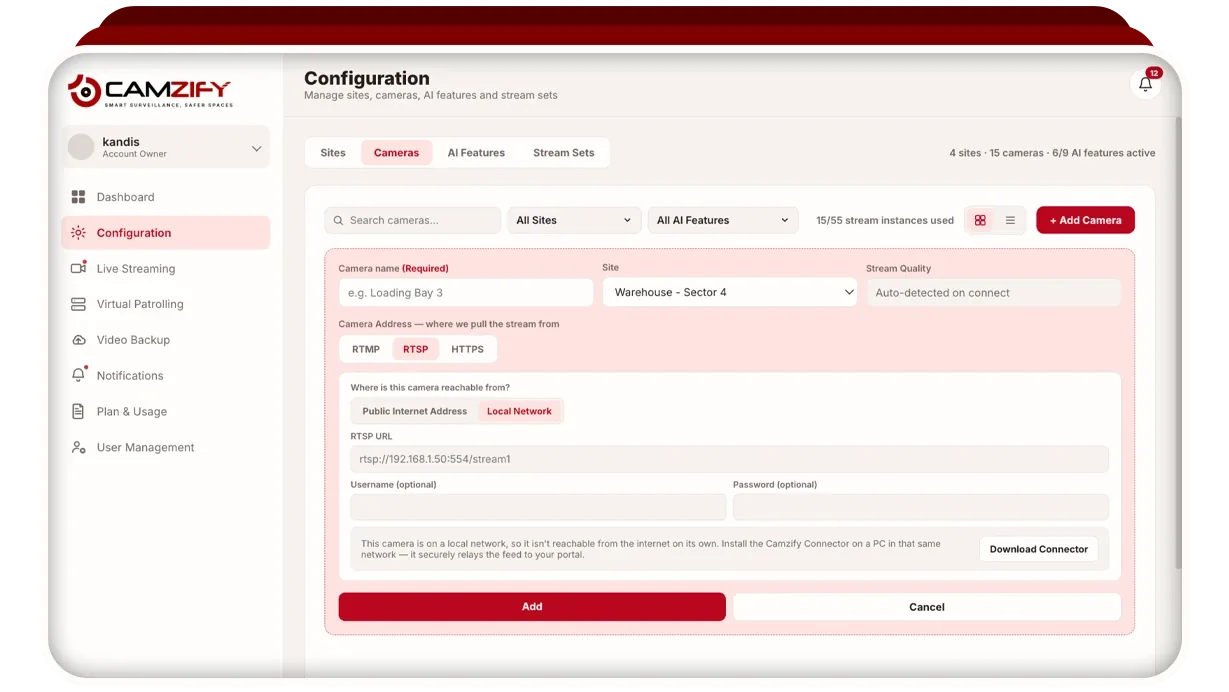
Most security cameras installed in the last decade can be used with a cloud VMS without being replaced. If a camera exposes an ONVIF or RTSP stream, a cloud video surveillance service can take that stream straight from the camera, or through a small relay on the local network, and the recorder the camera feeds today does not have to go on day one. This guide covers which cameras qualify, how to check yours in the camera’s own interface, what will not connect, the two ways a stream reaches the cloud, and how to try a single camera before committing a fleet.
Will my existing security cameras work with a cloud VMS?
Yes, if they are IP cameras that support ONVIF or RTSP, which covers nearly every IP camera made in the last decade whoever made it. Compatibility is decided by the protocol the camera speaks, not by the name on the housing.
Camzify connects to any ONVIF or RTSP-compatible IP camera over one of three connection types: RTSP, RTMP or HTTPS, where HTTPS covers both HLS playlists and WebRTC streams. No proprietary hardware is involved and nothing new is mounted. We do not keep per-model drivers, so a camera that exposes an RTSP URL connects whether or not its brand appears on the supported cameras page, which is a recognition aid for buyers who search by brand rather than a compatibility matrix.
The two protocols do different jobs. ONVIF is the open standard that lets cameras, recorders and software from different manufacturers discover and configure one another; RTSP is what carries the live video. A camera that supports RTSP but not ONVIF still connects, because the stream is what matters.
How do I check whether a camera supports ONVIF or RTSP?
Open the camera’s own admin interface in a browser and look under Network, Streaming or Integration for an RTSP URL. If the camera offers one, it will work; if its specification sheet lists ONVIF Profile S or Profile T, the same applies.
The URL usually takes the form rtsp://[camera-ip]:[port]/[stream-path], with 554 as the default port and 8554 the other common one. Most cameras require a username and password on the stream, so note the credentials while you are in the admin panel; Camzify has optional fields for them and asks only if the camera does. Three checks tell you where a camera stands:
- Does it speak ONVIF or RTSP? If you can find an RTSP URL in the admin panel, the camera qualifies.
- Can the stream be reached? A stream already reachable over the internet connects directly; a stream that exists only on the local network goes through the Camzify Connector.
- Is the picture good enough? If a person reviewing the feed can identify a person or vehicle at the distance you care about, the detection models have enough to work with.
If the protocols themselves are unfamiliar, ONVIF and RTSP explained covers them in plain language before you open the admin panel.
Which cameras will not work?
Three kinds of camera cannot be connected as they are: analog cameras with no network stream, consumer cameras locked to one vendor’s cloud app, and any camera whose stream cannot be reached from anywhere useful. Each has a route around it, but none connects by pasting a URL.
- An analog camera produces no IP stream at all. It needs an encoder on site that converts its video and pushes it out over RTMP, or a recorder that publishes an RTSP stream for its channels; either of those becomes the source, not the camera itself.
- A consumer camera locked to a vendor cloud app sometimes exposes no local stream. If there is no RTSP URL anywhere in its admin panel, there is nothing for a cloud VMS to connect to.
- A camera on a network that no PC can see while also reaching the internet has no path out. The Camzify Connector needs a machine on the same LAN or VLAN as the cameras with outbound internet access, and without one the stream stays inside.
A fourth case connects but disappoints. A camera framed so that a person cannot be identified at the distance that matters will stream and record, but detections and patrol checks will not have enough to work with. Resolution matters less than framing and lighting, so the fix is usually re-aiming the camera rather than buying a new one.
How does the camera reach the cloud: direct stream or the Connector?
An RTSP camera reaches Camzify in one of two ways: directly, if its stream is already reachable over the internet, or through the Camzify Connector, an application installed on a PC inside the camera’s network. Both end up in the same place; the route only decides how the stream gets there.
The direct route applies when the stream is already published to the internet through a static IP, an existing forwarded route, or an NVR that exposes it. You paste the URL into Camzify and nothing is installed. The RTSP setup guide walks through finding the URL, testing it and adding the camera.
The Connector route applies to everything else, which in practice is most cameras on a site network behind a router. The Camzify Connector runs on a Windows, macOS or Linux machine that can see the cameras and reach the internet at the same time, often an office PC or a small server already on site. You enter the RTSP URLs of the local cameras into it, and it makes an outbound connection to Camzify and relays the streams, carrying pan, tilt and zoom control for cameras that support it. No port is forwarded, no static IP is needed, no firewall rule is added and the cameras are never exposed to the internet.
Plan the upload bandwidth before the software. Every relayed camera adds its own stream bitrate to what the site must send upstream, and that sum, not the Connector itself, is the constraint that bites on a site with many cameras. The bandwidth guide shows how to work it out from the cameras' own settings.
Two other sources use the same console. An encoder pushes RTMP to a private ingest address that Camzify generates, with a server URL and a stream key, and an HLS playlist or WebRTC endpoint is added by its URL under the HTTPS connection type. The camera connectivity pages cover each route step by step.
Can my recorder stay while I move to the cloud?
Yes. A cloud VMS consumes the camera’s stream, so it does not need the recorder removed, and a recorder that publishes an RTSP stream for its channels can itself be the source the cloud pulls from.
That makes a staged transition the normal shape rather than a cut-over. The recorder keeps its local footage and its retention while cameras are added to the cloud one at a time, and cloud recording is switched on per camera with its own retention window, so the two can overlap for as long as you need to trust the new one. If a camera cannot serve a second stream on its own, a recorder that republishes it is the way around that.
The recorder is also the honest answer for some sites. Where upstream bandwidth is too thin to carry the cameras, or where policy says footage never leaves the building, the cloud does not win, and the cloud video surveillance page sets that comparison out row by row instead of pretending otherwise.
How do I try one camera first?
Pick one camera that matters, connect it, and judge the live picture before touching the rest. A single camera proves the protocol, the route out of the network and the picture quality at once, and it costs nothing if it fails.
- 1. Choose the camera. An entrance or gate camera on the site network, with the admin login to hand, is the useful test; a corridor camera proves less.
- 2. Find its RTSP URL. Open the admin panel, look under Network, Streaming or Integration, and copy the URL along with the stream username and password.
- 3. Decide the route. Test the URL from a machine outside the camera’s network. If it plays, connect it directly; if it does not, install the Camzify Connector on a PC on that network and enter the URL there.
- 4. Create the site, then the camera. A site is the physical location that groups its cameras. Add the camera against it and name it for the place, so that “Loading Dock B” rather than “Cam 14” follows it into alerts and reports.
- 5. Add the stream. Choose the RTSP connection type, paste the URL or select the stream the Connector is already relaying, and enter the credentials if the camera asks for them.
- 6. Verify it. Use Test Stream in the camera form, then open the tile in live streaming and confirm footage is flowing. Stream quality is detected automatically once the camera connects.
- 7. Judge the picture, then build on it. If a person or vehicle can be identified at the distance that matters, switch on recording, a detection or a place on a patrol sequence, the same as any other camera.
A stream that authenticated once but drops is the failure that quietly empties a patrol report later, which is why the verification step comes before anything is built on the camera. Once one camera works, the others on the same network and of the same make usually follow the same route, and how to add sites and cameras covers organizing them as the count grows.